I wanted to try to salvage the hood and trunk lids from the original since they look pretty good. Any of the original sheet metal I can keep, I will. So long as keeping it doesn’t mean spending more to repair it than it would cost to replace.
With the hood and trunk, I wanted to spend the time myself to strip them and prep them for paint. I hoped to save some money by doing some of the tedious work myself and getting a little more hands on with the body work at the same time.
I started with the trunk lid. I picked up an Eastwood Surface Contouring Tool (SCT) for manually stripping the paint and bondo off the metal. It’s a drum based abrasive tool and it works pretty good. It makes short work of large quantities of body filler as well. Unfortunately I know this because the trunk was a polished turd. I found a lot of damage on the back left edge which was sculpted from filler to look like an intact deck lid.

The tool did a great job of taking off the right things, and leaving the metal intact. All of the small scarring visible is from the previous paint job, not this iteration.
Unfortunately, this meant that using the original trunk lid was off the table, so I ordered a new one and added the original to the scrap pile.
I went and dropped the new deck lid off at the shop with the original hinges so Zac can use them for fitting while rebuilding the rear end. He has made some progress getting the back put together as well as a few other areas.
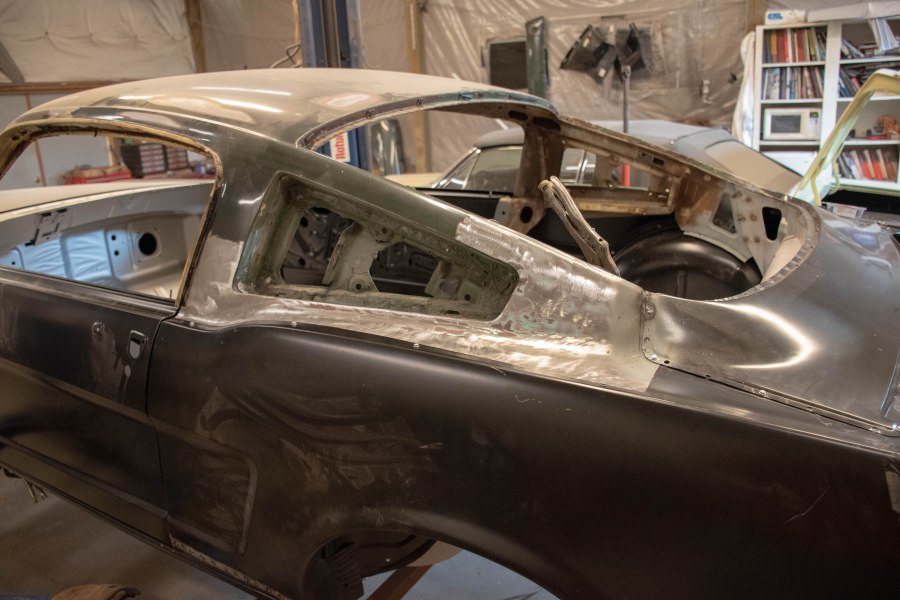
The torque boxes are in. This is not an original option as they did not show up until ’67, and that was the driver side only until ’68. There is a car in the shop having repairs done from the wheel falling off. It’s a good advertisement for why torque boxes are a good thing, even if they didn’t add additional rigidity to the frame.


The passenger side torque box came with the project. It’s a good 2 piece part. I also picked up a new driver side 2 piece torque box from NPD. Things are welded, but there is some final welding to be done still. That’s actually a pretty good description for the whole car at this point.
Quarter panels are almost ready for welding. Some tuning had to be done to the bottom front of this one as the bottom edge was high in the front and low in the back.

The lower rear window edge is welded in place, along with the support beneath it. It’s still screwed in some places since the quarter is not quite final. It still needs some cutting to butt weld to the sail for final assembly. It looks like the original sail area will be used. I was worried about that having rot. I would expect they are complicated enough that a reproduction would have issues fitting the insert. I haven’t restored them yet, but the inserts look good too.


Now that he has the trunk and hinges, Zac has what he needs to piece the trunk together with the tail light panel and rear valance. I have the original valance still, but I also bought a new GT style valance with reverse light and exhaust cutouts. I am still on the fence with that, but will sort it out before he’s done. I expect either one will need some tuning to get the lines right after all this reconstruction.
The last piece at this point is the hood. There is a little surface rust on the bottom of it, but it’s not bad. I hope I don’t find any surprises when I strip it, like I did with the trunk lid.

The lines look good on the hood. The hinges are awesome and they make lifting the hood take very little effort. They are a night and day difference from the hinges on my ’67, or on the original hinges with ’67 #2. I may have to go back and replace the ’67 hinges with these just because they are so smooth. I would expect this kind of quality from some of the modern hydraulic hinges which cost $700, but these are like $100 with springs, for the pair. I got them from NPD, where they are listed as improved and thicker.
I can see the light at the end of the tunnel for the sheet metal assembly. There is still a lot of welding to do and sheet metal screws to remove, but I am getting close to being done buying new part. The last major piece is going to be the dash, and I have to make some choices there. I can see that getting it’s own post in the future.

Pingback: New Year Fastback Update — Brad Albrecht’s Mustang Restoration Projects – Reblog – Automotive American
Brad,
I’m happy you’re making progress, But I feel guilty that there is so much wrong with the body that I didn’t see. Keep up the great work. Even if the hood has some damage you could use the OEM piece to line up the fenders and front end. The same with the trunk since it was probably the original.
Mike
LikeLike
It’s all good. When it’s done, all the body issues will be gone, and no hidden rust or damage. With the all new rear end, I am just using the replacement trunk lid for alignment since it is what needs to fit well. The quarters will get adjusted around it. I am pretty sure the hood will be fine. The fender lines look pretty good with the hood now. It took some tuning to get there with the new front clip, but it looks good.
LikeLike